Link: iZotope | Price: $249/€191+VAT/£158+VAT | Manual: PDF
The Noisemaker’s Alchemy Lab
In the “good old days” a DJ would dig and dig to find those songs no one else had to set themselves apart, and all it took was a sense of dedication to look. Nowadays, however, everyone has near-instant access to the same veritably unending selection of music and defining our style by song selection alone has become harder than ever.
Technology allows us to implement techniques that were never before required, let alone available. We are at a point where we can create our own beats and integrate them quickly and seamlessly into our sets, remixing live, mashing up songs, and creating a unique experience with a mad scientist’s gleam. And instead of focusing on individual songs to build our sound we need to find tools to create sounds that no one else has.
Enter BreakTweaker, the brain child of an award-winning DJ and producer working with an award-winning software development team best known for designing workflows that change the way we look at effects and sound design. After seeing it at NAMM I was, in the simplest of phrases, excited and was more than happy when they provided us with a copy to play with. There is a lot going on here, so we’re going to take it slow and go over what iZotope’s BreakTweaker is.
How it Works
BreakTweaker is a VST/AU/RTAS/AAX plug-in that requires a DAW to use. I plugged it into Ableton Live 9, but you can run it into whatever your DAW or host of choice is, and you can run as many instances as your PC can handle. By default, the plug-in is synced to your host tempo, but you can separate them if you want. The interface is built as a simple step sequencer: you have 6 tracks for sounds, and they can each have their own lengths. The process is definitely geared toward a standard electronic music workflow, but using track speed you can create some very complex rhythms and melodies.
Each track, or sound, is built using three “generators,” made up of a combination of synths and samples. BreakTweaker comes with a large assortment of factory samples, but you can feel free to add your own. Each engine type is complex, so let’s break down how they work individually. Remember that they can be combined, which we’ll get into later.
Samples
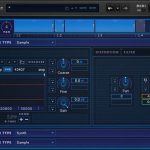
Selecting a factory sample is as simple as clicking the drop-down and navigating with the arrow buttons. iZotope also offers Discover which searches for similar sounds in their factory collection using their cloud service (this requires an internet connection). Once you find a kick that resembles what you’re looking for you can use their discovery engine to narrow down the selection without digging through pages and pages of kick drums.
From this point forward you have complete control of how your sample is played. You can trim the intro and outro points of the sample, and easily draw in crossfade settings using the visual wave form. Each sample has a Coarse and Fine pitch and Gain knob, which can all be assigned to two modulators selected from 4 envelopes and 4 LFOs (more on this later). The visualization of assigning these knobs to a modulator is simple yet elegant. You get two colors, your start and end points, which you can assign by clicking and dragging their position, and you watch the current position move as dictated by its modulator. Visualization like this is very rare in VST plug-ins, and the simple addition makes a world of difference when designing a sound.
Next, each sample can be run into the Distortion, Filter and Mix effects. There are 6 types of distortion: Warm, Transistor, Hard, Digital, Raw and Aliasing and you can assign two types of distortion to any generator. Each type of distortion is given two knobs, Amount and Tone. Each knob can also be assigned to two modulators, choosing from the envelopes and LFOs. There are three Filters: New York, Tokyo and Brick Wall. The New York filter has LP, HP and BP, as well as Cutoff and Resonance; the Tokyo filter has LP and HP with Cutoff and Resonance; and the Brickwall filter has LP and HP with just a Cutoff control. Once again, each knob can be assigned to two modulators, and the Filter can be toggled to hit before distortion. The Mix tab gives you control over the Pan and Gain, which can also each be tied to two modulators.
And then we have our modulators. There are 4 AHDSR (Attack, Hold, Decay, Sustain, Release) envelopes you can create, each with their own curve control. The LFO control gives you a simple slider to select your curve, and I have no idea how many LFO selections there are. Scrolled through and I think you have around 300 curves to choose from. And then you can set four of them per generator, three generators per lane. Each LFO has 8 parameters: Rate (how quickly it cycles through its settings) ranging from 0.1 to 50; Depth from 0.00 to 1.00 which controls how much of the modulation wheel the LFO travels, useful for stacking LFOs and not ending up with abject chaos (unless that’s your goal of course); Phase which sets where on the axis the waveform begins; Attack which sets how long it takes for the LFO to reach its full Depth; Sync which changes the Rate value from a decimal to a musical notation ranging from 1/4096 triplet (yikes) beat to 8 beats; Restart which will… restart the LFO every time a new note is played; and Invert which will switch the Polarity of your LFO. Since your sound design needs might require the same LFO or Envelope for each Generator in a Lane, instead of needing to redraw them each time you can simply link them all by clicking the check box in the corner. As a note, when you link envelopes or LFOs the other generators will not update until you make a change to the primary modulator.
Every generator in each track lane has access to its own 4 envelopes and 4 LFOs. Each sample is controlled individually, or together with linked modulators. Creating a complex drum loop, though, may require more texture added to your sounds. Because three samples stacked together with their own sound parameters isn’t enough, you can also use synth sounds to develop unique textures.
Synths
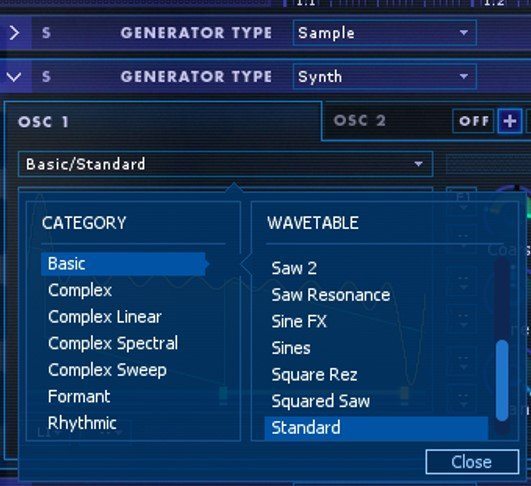
Each lane can be made up of three samples, three synths, or a combination thereof. Synth generators offer a completely different set of tools. You have two oscillators (each can be wavetables) that can be mixed in 4 different ways, also with their own pitch (Coarse and Fine) and gain control which can all be tied to two modulators. To turn any synth waveform into a wavetable you simply have to assign a modulator to it (you can add up to two) and move the sliders to select your beginning and end points. Oscillators are broken up into 7 categories (Basic, Complex, Complex Linear, Complex Spectral Complex Sweep, Formant and Rhythmic) containing over 100 different waveforms to start with. And then, when you select a modulator you can fine tune how the wavetable blends with a simple slider underneath the window.
You can have two waveforms per generator per lane. They can be mixed using Additive, Ring Modulation, Amplitude Modulation (AM) and Frequency Modulation (FM). This is all done using a simple graphical interface which makes selecting all of your start and end points beyond easy. Each synth generator has access to the same distortion, filter, mix, envelopes and LFOs that the samples do, all with the same modulation control.
So you can stack three generators per lane per sound, and completely control how those sounds are created using a very elegant design. Before we even get into use case, using the included modulators and sounds can create huge textures, or minimal glitch bleeps and bloops really easily. How well does it work in practice, though? Let’s make some sounds.
Sound Design
Building a basic drum kit or synth patch is rather simple in BreakTweaker. The interface is easy to understand, as long as you have a basic knowledge of synthesis. To create a six sound patch simply navigate through your drum sounds, organized by type (snare, kick, clap, etc.) and select them. A simple 6 sound drum kit is easy. But when you want your sounds to be more complex, or more crazy, that’s when stacking generators and editing wave forms comes in handy.
Just to be super clear, I am far from an expert sound designer. I like playing with knobs and faders and seeing what happens, but I usually rely on the factory presets. It’s something I have spent some time learning, but it is a very intense process. BreakTweaker, though, puts so many tools at my disposal that I can create a huge noisy kick drum easily using two samples and a synth.
First we want to select a kick drum sample that triggers every time. I loaded the kick under Trance labeled AB-Kick 3. I like the start of the kick but not the tail. Cutting off the tail is easy, I just set the end point. The second generator is selected as a simple, tuned sine wave with a long release on the envelope tied to the Gain. The sound will travel as long as the step in the sequencer lane is held. I tie the Transistor Distortion Amount to an envelope with a long attack so it doesn’t hit until the sample is done playing. Simple, easy, a nice fuller, simple kick drum with a little distortion.
Well, let’s say I want a slightly crazier sound. Just adding a simple LFO to the sine wave completely changes how the kick drum sounds now, giving me a dirtier, digital feel. Or I can stack another kick drum, change the start point and loop the sample in reverse to give me completely different sounds. I actually found it easier to create completely insane, bizarre, noisy samples than to create simple bass sounds and leads, mainly because there are so many tools available quickly and easily.
Since BreakTweaker is still a step sequencer, you need to draw the patterns in for each sound. When you focus on an individual track you have access to its lane at the top of the window. You can resize the pattern from here, but you can’t move back and forth without resizing. As an example, by default your pattern is 1 bar long. If I decide, after focusing on the track, that I want it to be 2 bars I simply click and drag so it is 2 bars long. Well, now I can’t see the first two beats and I can’t get back there via scrolling, so I need to leave the track screen, navigate my focus on the main sequencer, and then go back. Too many extra steps for what should be very easy.
To change the pitch of sounds is just as basic by assigning the coarse or fine pitch to envelopes and LFOs. It is still a step sequencer, though, and while each step can be assigned its own relative pitch in + and – steps, it can’t be played with a keyboard or controlled via MIDI. Playing melodies is therefore possible, but it requires each individual step to be assigned its own pitch, and there’s no piano sequence, only steps.
Working in extremes while designing sounds is never the ideal since you can easily end up with uncontrollable chaos (though that may be your objective). BreakTweaker makes this even easier by providing so many tools to destroy and recreate your sounds. But the power it provides is intuitive and simple, and the visual access from the macro to the granular level of your sound makes designing new and unique sounds actually fun.
Breaking Sounds and Songs
Alright, so we’ve covered the treasure trove of sound design buried in BreakTweaker, and now we are going to look at how to combine these sounds. As I mentioned above, there are 6 tracks, each built on three sound generators. Each track in BreakTweaker has a variable step length, from 1 to a maximum of 32 steps. You can change the speed of each track but doing this live can force the lanes to fall out of sync, though that might be your goal if you are going for more ambient and polyrhythmic sounds. Keep in mind, though, BreakTweaker is not meant to be a live performance tool. If I could link an envelope or an LFO to the speed, though, I could automate the chaos.
Each step in each track’s lane is filled by simply click on it, and clicking on the top of the box and dragging up and down alters the velocity of that step. If you right click and select “choke” you can kill sounds instantly, making for some cool rhythms. The length of the sound is dictated by how many steps the cell is. If you have a pad sound it will stop playing and rely strictly on the envelopes once the cell ends, just like aftertouch on a keyboard.
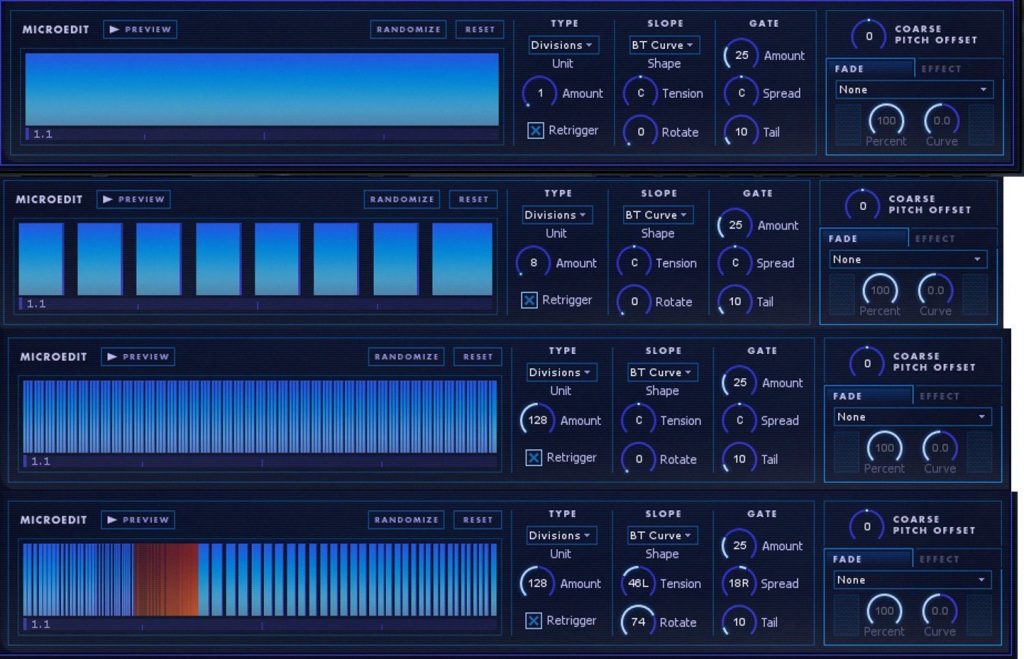
But wait, just like everything else, there’s more. Each cell can be controlled via the micro-edit window. You can access this window whether you are looking at the step sequencer as a whole or the steps for an individual track. The Microedit window is where BreakTweaker really goes from a sound design tool to a complete audio destruction tool. This window allows you to replay the sound you have selected at a faster rate, cutting up the sound within the step. A basic function of this would be playing a hi-hat 4 times in a beat. You can click four different steps with the hi-hat in the sequencer, or you can draw one long step, and select four divisions in the microedit window. Makes sense, right?
Well, it gets a lot bigger than that. BT’s influence really shines here, letting you create really bizarre, lush rhythmic sounds. There are four different types of rhythmic tweaks you can use: divisions, numerically repeating the sound between 1 and 256 times per step; Pitch, repeating the sound so quickly it matches a specific pitch between A0 and B4 (more on this in a second); Time, which lets you repeat based on a rhythmic value, between cutting it and half and I however many divisions 1024 triplet steps equals; and Speed, repeating between 27.5 Hz and 493.9 Hz.
Keep in mind, this is the first step. Personally, I found divisions the easiest to draw in for simplicity’s sake, but when you start wanting to play melodies with your drums then the Pitch setting is required. Setting the value to your dividing type is done by either rotating the associated knob, or double clicking on the value and typing what you’re looking for. It can also be set to Retrigger, which restarts the Generators, Envelopes, and Modulation every time a division is triggered. This is the difference between a stuttered, gated sound and that memorable blrrrrrrrrp sound we have all heard. Generally Retrigger is selected, but when you turn it off you can get some really fascinating textures underneath a complex sound.
For example, selecting a basic kick drum and stretching it across an entire beat, and divide it into 88 segments. With Retrigger selected you get an almost pitched sound, but without it you get a grainy, glitchy kick drum, completely different from the original full sound selected. Each step in the sequence can have its own different division, allowing you to create musical notation out of any sound you’ve designed, but in a different method than using coarse pitch. You can use them together, as well, to create bizarre auto-tune style sounds
Beyond the Type of divisions you can create, there is Slope and Gate. Slope changes how the divisions are spaced, using 35 different options. These all create subtle changes to how the sections are played, or using the Tension and Rotate knobs they can create completely bizarre sounds, both musical and chaotic in nature. The Gate options change how the sections are spaced and how long their tail is, allowing each cut up segment to fade out instead of abruptly ending. This is all visually shown on the microedit screen.
In the DAW
BreakTweaker does not work stand alone, and must be integrated into a host application. Putting it into a track is easy, and you can assign each track to its own audio track in your host to use your own effects. You can only use your MIDI track in your DAW to trigger the 24 patterns, so your sound design efforts can only go so far. Due to the design of BreakTweaker, and the way it processes sounds using the MicroEdit engine, it is impossible to use a MIDI keyboard to “play” your notes. To find a middle ground, you can use MIDI notes C1 through F1 to trigger your sounds in BreakTweaker out into your DAW, or to record the audio separately. The pitch offset knob can go a long way, as the Pitch Dividing type, but it’s not the same as performing your sounds with a keyboard. That being said, it isn’t the purpose of BreakTweaker, so it isn’t something I would hold against the application.
There are two main output features of BreakTweaker: Gain and Intensity (I really want to type that in all caps for some reason). Gain is self-explanatory, but Intensity is their built-in compression module which makes everything… more intense. Really, it just makes it bigger and louder, and should be used sparingly and only when needed. I was able to get most of the sounds I needed big on their own, and the Intensity control is there in case you need to make them fit a little better.
There is a good amount of control for playing patterns tied in using MIDI notes. C1 through F1 will trigger sounds in BreakTweaker, and you can record those hits if you play it like a drum machine. C2 through B3 will trigger your patterns (24 notes for 24 patterns), which can either be played on your keyboard or drawn into a MIDI track.
Playing MIDI notes can have a few different interactions. BreakTweaker can work in Gate or Latch Mode. Gate Mode will only play the pattern for as long as the note is held, Latch will play until the note is pressed again. While in Latch or Gate Modes the position of the second MIDI note is important. If the notes overlap then the playhead within BreakTweaker will continue moving forward when patterns change, whereas if notes do not overlap each pattern will start at the beginning. If you always want patterns to start at the beginning just select Always Retrigger. In Latch Mode the pattern will play infinitely until either a second pattern is played or the same pattern is triggered, thereby stopping it. In Gate Mode the pattern will only play as long as the note is triggered.
I was able to run a few instances of BreakTweaker before my computer’s disc started to stutter, but your mileage may vary.
Final Thoughts
So that was a lot, right? BreakTweaker has a lot of power in it, and if you’re familiar with Stutter Edit it is very similar. I really wish I could use the sounds I built with a standard keyboard, but I understand that isn’t the objective of the application. It is supposed to be used more as a loop-based tool, creating sounds and rhythmically destroying them. After creating these amazing sounds, though, I really wanted to assign them to a track and play them with my keyboard to experiment.
Beginners to sound design and more experienced minds can easily wrap their heads around what is happening and take advantage of the whole host of power iZotope has provided. They created a unique workflow very different from other large soft-synths like Massive without giving up the power, and created a rhythmic tool capable of building huge sounds and weird patterns. While BreakTweaker installs 2GB of high quality audio content which you can load into any sampler, it is so much more than that. If all you are looking for is samples, or sounds, and have no interest in really deconstructing and then reconstructing your own unique process then this might not be for you. If you are willing to dig in, though, and use the professional, excellently designed tools to create your own unique, powerful sounds then this tool provides almost everything you could need. The $249 price tag may sound steep for a plug-in, but there aren’t a lot of tools out there providing as much control over your sound.


