I don’t have a huge music collection, but it’s enough to take ages to copy between storage devices, and keeping it updated on multiple devices is a nightmare. I’m sure I’m not alone, too. You might have a desktop and laptop computer, or if you’re a career DJ, you might have a backup laptop which you need to keep up to date with any music library changes and software settings.
When I found myself with two MacBooks, one brand new and shiny, the other my seasoned DJ rig, it seemed like it should be trivial to make sure all my music and settings remained in parity across both laptops. There are lots of ways to keep your music synced between laptops and across various devices, from cloud syncing to peer2peer and local NAS solutions, but most cost money up front or as subscriptions, or the free options just don’t quite cut it.
Having researched various options, I turned to the Open Source community for the answer: Syncthing. I’ve mentioned before that I’m a big fan of open source software, so imagine my excitement as I read through the features of the software. I’ll be using OS X and Traktor as my example to set up, since that’s what I’ve got, though Syncthing works for anything from Windows, OS X and Linux… right through to FreeBSD and Solaris.
First things first… always back up your computer before you start. Regardless of the risk, it’s always good practice to keep a spare up-to-date copy of your files that will be safe should your laptop bite the dust. If you’re on OS X, Time Machine is a decent enough system and it comes with the OS.
Syncthing
Syncthing replaces proprietary sync and cloud services with something open, trustworthy and decentralized. Your data is your data alone and you deserve to choose where it is stored, if it is shared with some third-party and how it’s transmitted over the Internet.
That’s the hard sell from the project’s website. While a tad fiddly to set up initially, once it’s up and running Syncthing has low overhead, and you only need to run it once in a while after something changes to keep any new files in sync on the secondary computer. The software supports backing up just changes (ie new files), so it’s ideal for ensuring your library stays in parity.
There’s a ‘getting started‘ guide over on the official site that can get a bit technical, but here’s my process for setting up the software as of mid-January 2015. At its most basic, Syncthing is a locally run server with a web-based front end that lets you change the settings, whitelisted devices, and folders. There are plenty of apps that allow you to access the GUI by running in your system tray / taskbar and providing a wrapper to launch the server. Both parts of the software are still in active development, so there will be changes, but the fundamentals should stay the same.
1. Preparation
First, download both the Syncthing server and the QSyncthingTray front end for any computers you want synced. Being an open source project, there are plenty of options to choose from, but I found this one is fairly cross-platform so should meet most people’s needs. On Github, you can grab QSyncthingTray for either Windows or OS X.
Ensure you unzip and add the Syncthing server files somewhere you’ll remember, as you’ll need that information later. I just have it in a folder in my user ‘Documents’ folder. To keep it simple, I use the same location on both machines, ensuring consistency. It’s also worth noting that Syncthing keeps all your config files elsewhere, so even if you accidentally delete it, copying the files back and running it again will keep things the way you had them previously.
After adding the QSyncthingTray app to your Applications folder on OS X, run the Syncthing server executable and you’ll be warned about installing software from an unidentified developer when you try to run it, and the OS will prevent you from running the application. To get by this, you’ll need to go into ‘System Preferences’, ‘Security & Privacy’ and hit the button to allow it to run. It’s a hurdle intended to prevent malicious apps from running without the express permission of the user (via the preferences), and only needs to be done once per app.
2. Setting up your primary device (the master collection)
Once you have both the server and QSyncthingTray installed, there are a couple of things in the desktop app to set up, and you’ll need to get all your shared folders and security options set in the server GUI.
An initial run of the Syncthing server via its executable file should open https://localhost:8384 after a terminal window looks busy, which is the web front end that lets you change anything you need in the server. First thing to do in the server GUI is to choose what folders to share. For each folder, you need to hit the ‘+ Add Folder’ button to set them up. You’ll then see a popup with loads of options to get a folder synced.
Folder ID is the name you give it within Syncthing. I just named all mine the same as the folder itself. This makes it easier to manage should you have loads of folders you want to keep up to date.
Folder Path is the location of the folder you want to sync. You will need to make sure the path is from your hard drive root, ie the default music folder in OS X is ‘/users/username/music’. Syncthing sets up a default folder within the user file system named ‘Sync’ that, out of the box, works much like Dropbox or Google Drive do: You just drag files to it and watch it work it’s magic.
Folder Master is to determine if the folder is protected from any alterations on other computers. This is useful if your main DJ laptop is the one you use most and you just need to back up. If anything happens on the other computers, your main library stays how you left it.
Here’s the ones I set up along with the default folder:
- Main DJ music libraries. I personally have my listening music separate from my DJ stuff, so I’ve got both folders set up.
- DJ application collection folder, which houses your database. This can be helpful to ensure your MIDI mappings, and file analysis is up-to-date across everything.
- Any other folder you’d back up for DJing.
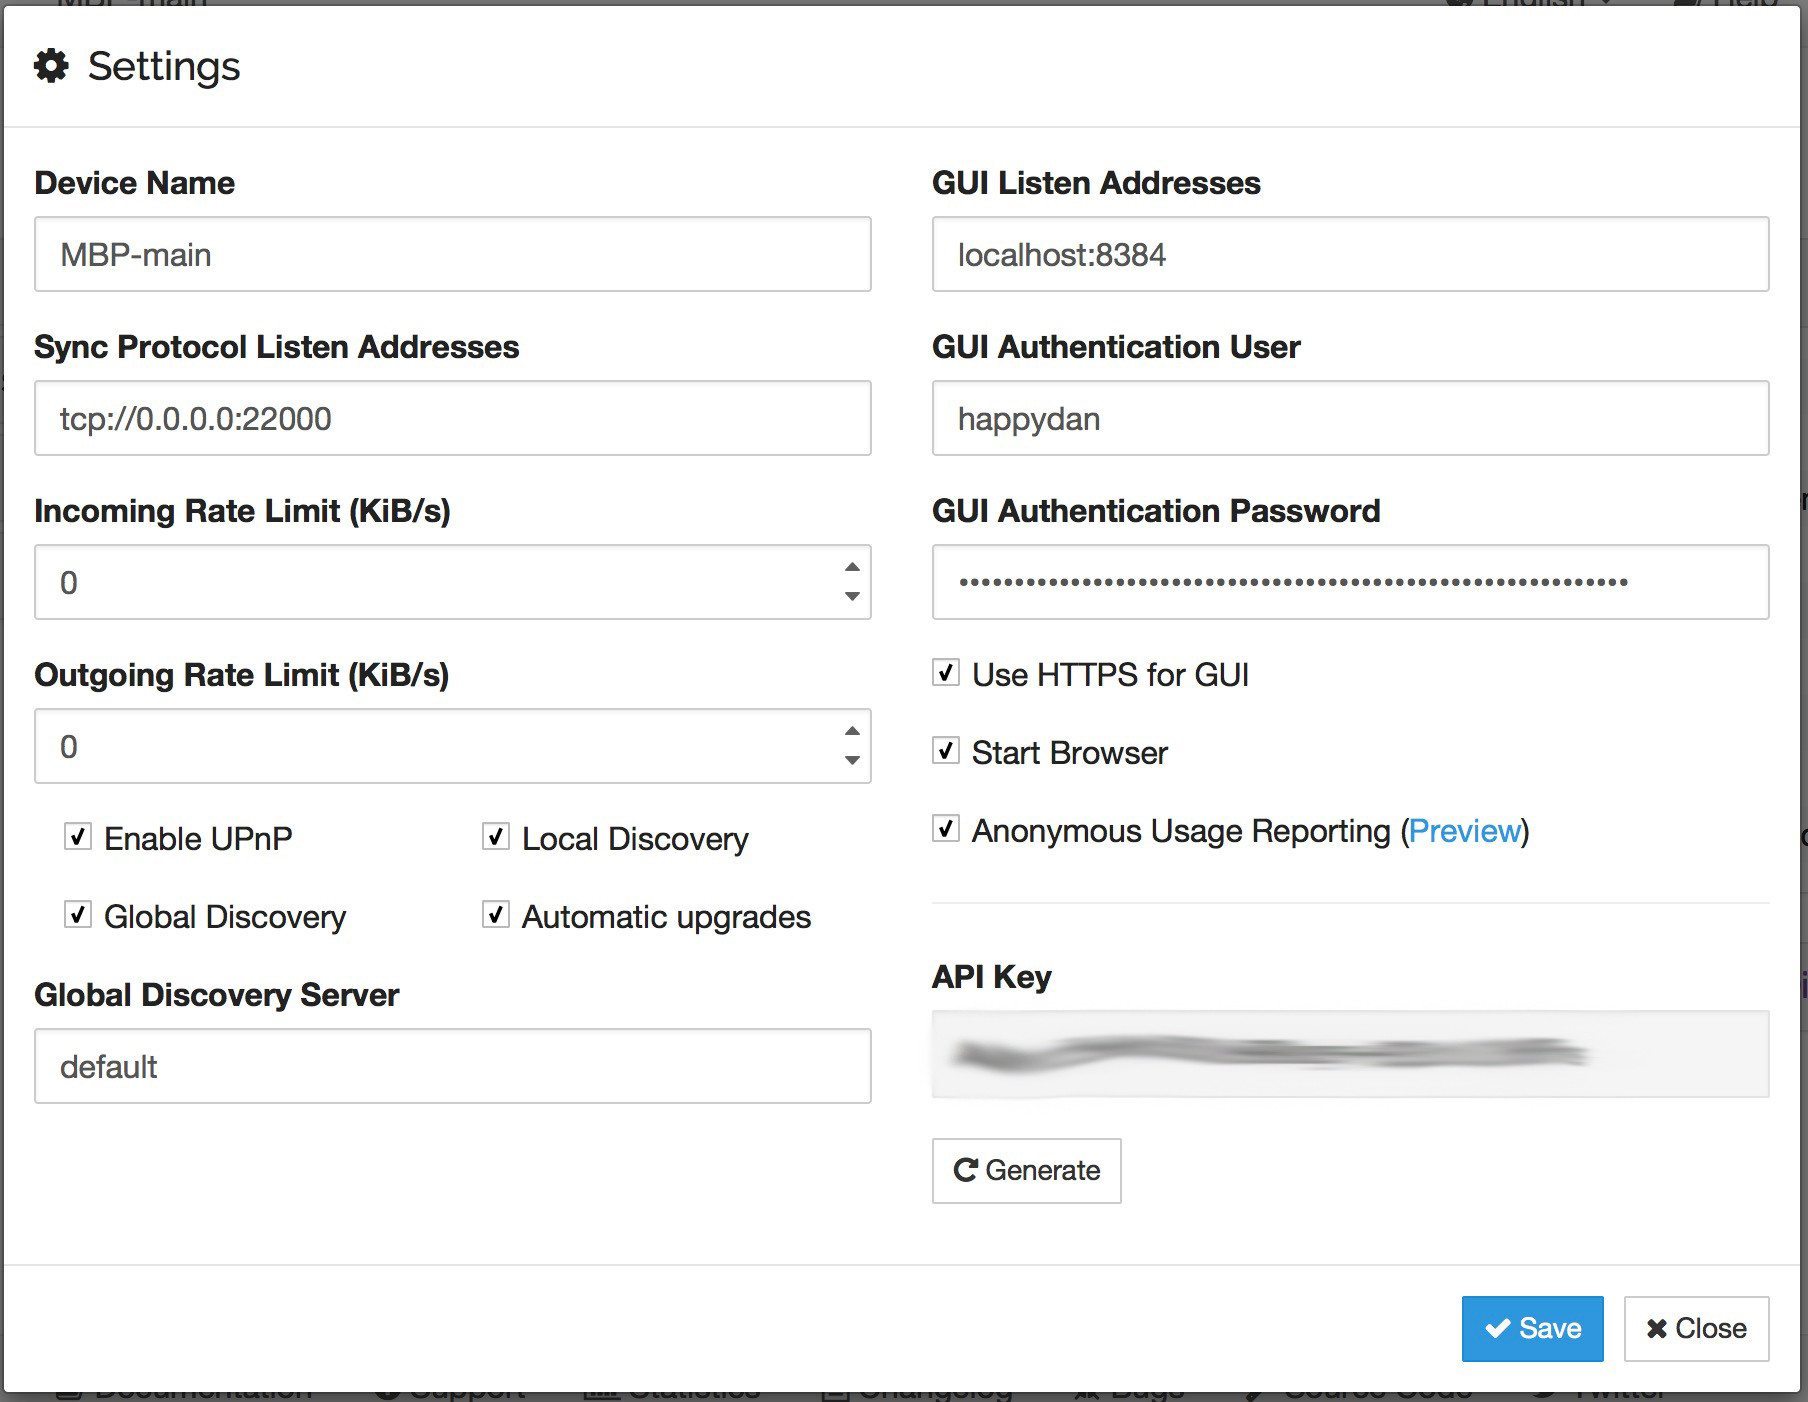
In the Actions > Settings menu, Name your laptop in a way you’ll remember it, and enable ‘use HTTPS for GUI’ s it asks for a password each time you use the GUI.
Go to ‘Show ID’ in the menu and take note of the device key. I used a Google Keep note that can be opened on any device that needs to swap keys. You’ll need to take a note of the device ID key for any computer you’ll have in the share group.
Two devices will only connect and talk to each other if they are both configured with each other’s device ID. Since the configuration must be mutual for a connection to happen, device IDs don’t need to be kept secret. They are essentially part of the public key.
Once everything is working as you need it on the server, it’s time to get QSyncthingTray working properly. The two screens to be concerned about are the ‘Main’ and ‘Launcher’ tabs. On the ‘Main’ tab, you need to ensure the URL is the same as the one you used to access the GUI via your browser. Take care to check whether you’ve got http or https at the front. Next, you tick ‘Authentication’ and add in the username and password you created earlier. Finally, you just need to make sure all the options under ‘Appearance’ are checked.
On the ‘Launcher’ screen, make sure ‘Launch Syncthing’ is checked and point the app at the location for the Syncthing server. If all goes well, it should read ‘Already Running’ to show that the server is up. Don’t worry about the iNotify settings as they’re used on Linux systems to provide notifications.
3. Setting up secondary computer(s)
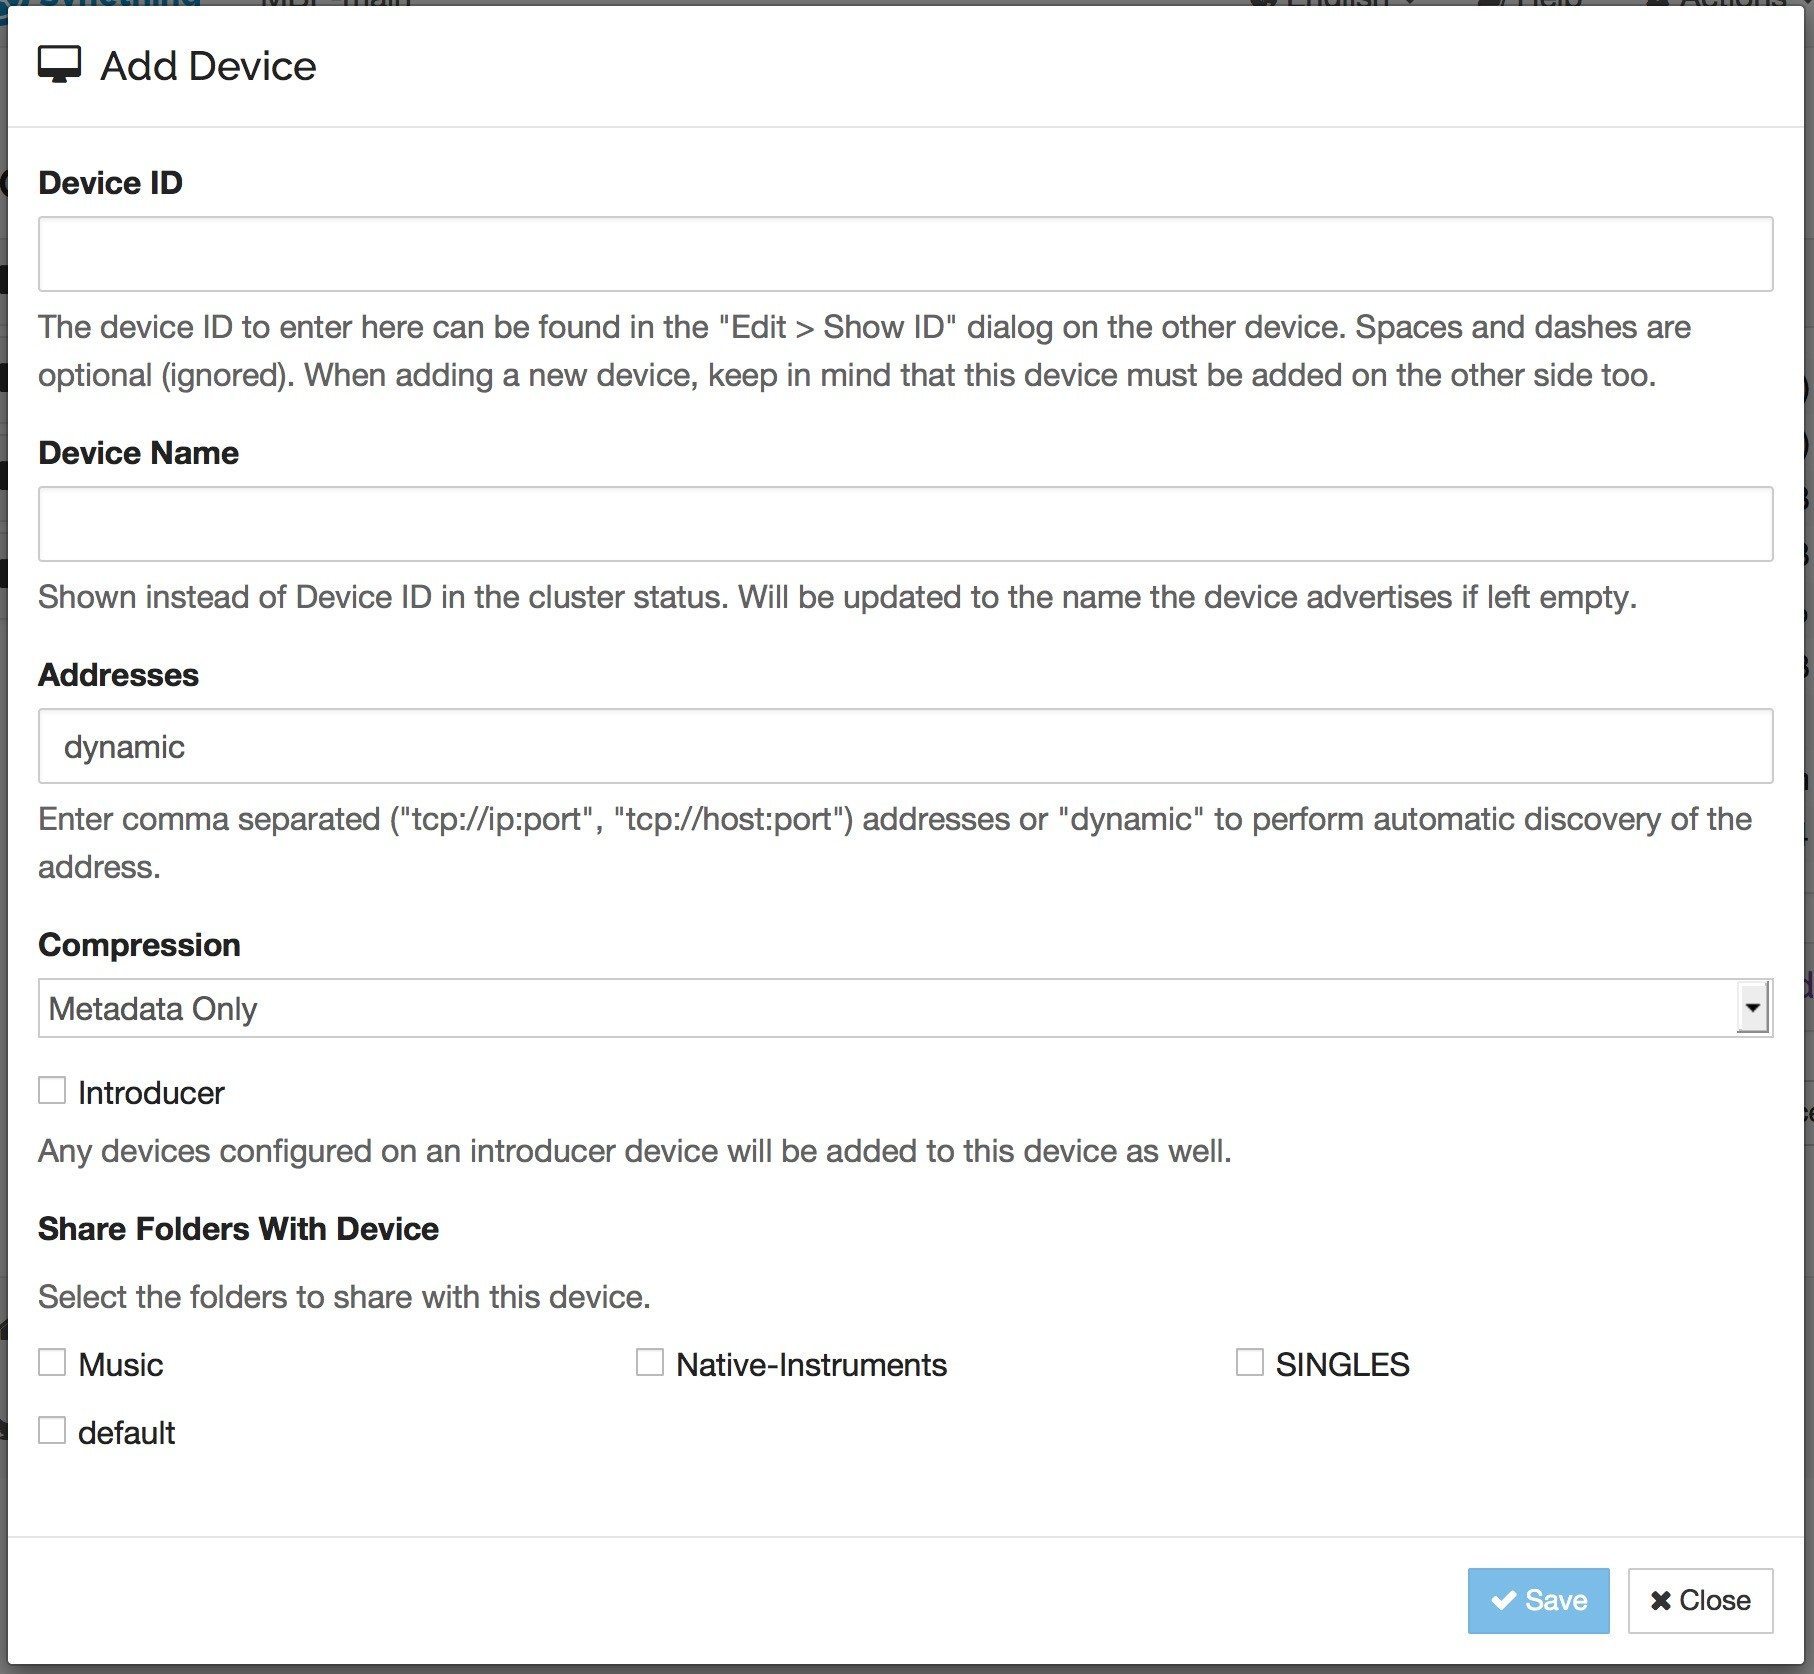
You’ll also need to set up Syncthing on your other computers so that they’ll find each other on the network and know which folders to sync. For this, you’ll need your saved device IDs, which you’ll have saved somewhere that’s easily accessible to both computers. Add your primary device’s ID via the ‘Add Device’ button, bottom left. Repeat on your primary with the all secondary devices’ IDs.
You need to go through the ‘Add Device’ popup and set everything up to make sure it’s all automatic and correct.
Device ID is where you add the long string of random numbers and letters from the machines you want to have access to Syncthing. Both machines need to have each other’s ID to work.
Device Name is where you give the device a name you’ll remember. This is more important if you’ve got lots of computers connecting and need to keep track of them.
Make sure the Addresses text box is set to ‘dynamic’, so that they automatically scan for each other, rather than have fixed locations. This is especially useful when you’re on a network that assigns IP addresses that can change from connection to connection.
Compression can be left to whatever it defaulted to.
Leave Introducer unchecked. We’re setting it all up by hand rather than letting devices add themselves, which keeps it all more secure.
Share Folders With Device is where you choose which of your shared folders the other computer is allowed to sync. This is particularly useful if you’re using Syncthing to share different folders with different devices.
Once that’s all done, hit ‘Save’, and, as long as you’re set up on both computers, you should start to see some activity on the main Syncthing screen (unless it asks for a restart on the main screen). Just close the window and leave it running! The QSyncthingTray taskbar icon shows you your connections along with traffic activity and which files were last synced. You can also click on them to access the folder they’re in.
Options!
While I’ve gone into the free (as in both beer and speech) option here because I’m a skinflint, there are real reasons why it’s a better way of doing things than some of the competition. One of the bigger ones is that you’re keeping your files completely on your local network, which is more secure, as well as much faster to transfer.
There are always going to be other ways of keeping everything synced between devices, but you might have to sign up for a subscription to get the functionality you want. Here’s a round up of some of the other options out there. Some are very simple cloud-based solutions, and
Dropbox (1 TB: £7.99/mo approx) www.dropbox.com
The ubiquitous cloud storage service gives you a respectable 1TB for around £100 to back up your music. Like any web-based system, you’ll need to be connected to the internet (rather than just on a network, ad-hoc or otherwise) and sync using your (likely) much slower internet connection.
Google Drive (1TB: £7.99/mo approx) drive.google.com
Google’s take on Dropbox comes in at a similar price, but offers much more flexibility as you also get the Docs suite of apps, should you need that sort of stuff.
SpiderOak (1TB: $12/mo approx) www.spideroak.com
This is another cloud-based service, but it’s very security focused, and isn’t a huge amount more than you’d pay for alternatives.
BitTorrent Sync (Pro: £29.99/yr) www.getsync.com
The company that developed the Bittorrent protocol harness the system in much the same way that Syncthing does: by using peer-to-peer hosting to mirror your data. While it’s much easier to set up that Syncthing, you’re paying £30 a year to get the more granular features. If you’re literally just backing up your music folder, the free version might be OK.
Final thoughts
I wrote this quick guide based on my own experiences as a cheapskate, and as a bit of a proof of concept. I’m sure I’m not the only one that runs more than one computer and needs to maintain their music library and software settings across multiple computers, so hopefully you found this guide helpful.
Syncthing isn’t the simplest software to set up, but it’s the most flexible and the most secure of the bunch I mention. If you’ve got any questions, you can always ask in the comments and I’ll try to help. There’s also loads of useful information on the Syncthing website, as well as a list of community contributions to the project for all sorts of platforms, active forums where you can ask for expert help and many of the actively maintained community projects have their own discussion areas. The developer behind QsyncthingTray, Matt Sieren (who also happens to work at Ableton, coincidentally) is always around and was a great help with writing this guide, even going as far as adding features I’d suggested within a couple of days of them being suggested.
And that’s why I love the open source community: People are not only enthusiastic about their projects, they listen, and things can be fixed very quickly. If you ever find yourself struggling to find some paid software to meet a need, head over to somewhere like Github or Google Code to see if there’s something that can help. You might just find something like Syncthing that may not be point and shoot, but can offer much more flexibility and is light on the wallet.
Got any questions? Found this useful, or got any other open source software you can recommend to your fellow DJs? Let us know!


I use bit torrent sync free to back up files between laptop, desktop and a raspberry pi. The pro features really aren’t necessary for what you want to do with a music collection (things like selective sync etc). As you say btsync works on a similar premise in that your files are never transferred to a third party but the setup is significantly easier than you have described for sync thing, even on the pi! Still, I can’t imagine it works any different ☺
I use SyncBack for my needs which does a pretty good job for free.
Actually Dropbox does local sync too https://www.dropbox.com/en/help/137
Although this still looks really interesting, and potentially more versatile. Will check it out. Cheers Dan!
Wanted to chime and bring some clarification for the pricing of the “pro” version of BitTorrent Sync. The personal pro version is 39.99 (Quoting $US here) and is NOT an annual charge. Business yes, personal no. They changed their policy a few months back after the consumer base cried foul.
I use Freesync thru a NAS :
Updating to NAS
Mirroring from NAS
That relies on extra hardware doesn’t it?
Yes. Like using an external drive but this one is networked and faster than cloud in most cases.
To be quite honest, this an “ok” method. Nothing has ever worked better for me than backing up entirely by hand – meaning, and first-off, I use an external hard drive to back up all my files, whatever I have on my laptop(s) will be updated by hand (not by some software) to my external and then fully compared by the numbers to make sure that each folder that I am manually syncing has the same exact amount of files. It is the most SECURE way I can back up my music and gives me 100% peace-of-mind. And from that point just makes it easier for me to take that external and make an exact copy of it onto a secondary external drive for safety’s sake. I had a computer crash on me once just before I left home for a gig, and thankfully, the day before, I had just performed a manual backup.
Backing up by hand doesn’t let you do delta backups and can take a lot of time if there’s a big amount of data. I suggested this method more for people that might have multiple computers they use for DJing/production and want parity between their content. I think I even mention in there that you should always do a proper backup of your files.